Pages

Showing posts with label quadcopter. Show all posts

Sunday, 11 May 2014

Sistema integrado para FPV con pantalla LCD de 7" y estructura 3D-printed - 1a entrega

Integrated FPV system with 7" LCD screen and 3D-printed frame - 1st delivery


Hace ya un tiempo que compre los componentes para poder montar un FPV con los aeromodelos que tengo, o un hipotético renacimiento del quadcopter en el futuro, pero por falta de tiempo, otros proyectos y la falta de una pantalla o unas gafas FPV (googles) había dejado el proyecto en stand-by hasta ahora.
It's been a while that I've bought some components for building up my FPV system to be mounted in my planes or a future re-born of the quadcopter but due to a lack of time, other projects and the missing screen or googles to view the transmission the project was in stand-by.

El problema era que no estaba seguro de invertir 300€ en los googles sin tener claro si luego realmente les iba a sacar partido, así que me decidí por comprar una pantalla LCD de 7" en ebay que me costó menos de 40€ incluyendo la placa controladora con entrada para AV, VGA y HDMI.
As I was not sure if investing almost 300€ in the googles was going to make sense, I just decided to go for a 7" LCD screen that I've bougth in ebay for less than 40€, including the controller board (with AV, VGA and HDMI inputs).

Pero lo siguiente era poner todos los componentes juntos, así que diseñé un pequeño marco para imprimirlo con la impresora 3D que me sirviera para acomodar los componentes de una manera compacta, y en un futuro tal vez poder montar el conjunto sobre la radio RC o en un trípode.
But now I needed to put everything together, so I designed a 3D-printed frame to arrange the componentes with the idea of keeping the system compact (and maybe later on mount this directly on top of the RC radio).


Thursday, 14 November 2013

Porqué puede ser interesante prestarle atención a "Teoría de Control" en la Universidad

Why could be interesting paying attention to "Theory of Control" at the University

Si me hubieran mostrado este video antes de cursar "Teoria de Control" en la facu, seguramente que le hubiera presetado 100 veces mas atención que la que le presté... lo único que me acuerdo es que el libro era de tapa azul, y que había mucho Lagrange por ahí (Ingeniería de Control Moderna, Katsuhiko Ogata).

If I would have been invited to see this video before taking "Theory of Control" at the University, I'm sure that I was going to pay 100 times more attention that what I did... the only thing that I remember is that we used a blue book, and that there was a lot of lagrange in there (Modern Control Engineering, Katsuhiko Ogata).


El video tras el salto / The video inside...


Monday, 7 January 2013

QUADCOPTER - Entrega final

QUADCOPTER - Final delivery

Se podría decir que mi historia con los quadcopters tiene un final agridulce.
I can say that my story with quadcopters has a bittersweet end.

Desde el punto de vista técnico, he sido capaz de diseñar y construir dos quads differentes, usando dos configuraciones (+ & x), dos materiales principales diversos para el cuadro (madera y aluminio), he podido probar dos placas controladoras (HK v1.1 y HK KK2.0), actualizar el firmware de las controladoras, aprendí cómo setear los ESC con el recorrido del stick de la radio e investigar respuestas de vuelo usando 4 medidas diferentes de hélices (6", 8", 10" y 12"). Más aún, he podido resolver problemas de estabilidad (causados por la mala configuración de los ESC) y he conseguido al final un quad bastante estable. Todo esto puede considerarse la parte "feliz" de la historia.
From the technical point of view, I was able to design and build two quads in two different configurations (+ & x), using two different basic materials (wood & aluminium profiles), try two different controllers (HK v1.1 and HK KK2.0), introduce new firmware to the controllers, lern to adjust the ESC and investigate flight behaviors using 4 different propeller sizes (6", 8", 10" and 12"). Even more, I solve stability problems (due to the ESCs not properly regulated), and I was able to get a pretty stable quad at the very end of the process. This can be considered the sweet part of the story.

La parte no tan felíz, o mas bien "amarga" comienza con mi último vuelo realizado, que puede pasar a convertirse en mi "último" vuelo. Una vez conseguido un buen quad, estable y manejable, sale a la superficie el hecho de que soy muy malo volando estos bichos endemoniados. No he sido capaz de realizar un vuelo normalito, y casi que pierdo el quad, debiendo de cortar motor con el quad como a 30m de altura porque sino lo perdía de vista, con la consequente caída en picada y el aporrizaje... (otras) dos hélices a la basura y un brazo del quad de aluminio todo doblado fue el saldo de la catástrofe.
The bitter part of the story starts with my last flight, which I consider probably my final flight. Now that I have a pretty stable quad, it comes to the scene the fact that I'm awful flying this damned things. I was not able to do a normal flight test and I almost lost the quad, needing to cut it off and make it fall before loosing it from sight, with the consequent hard landing, two (more) propellers broken and one aluminium arm bended...

Así pues, este post es para declarme oficialmente como un queso volando quads, y hasta que no consiga un simulador o que mi hijo sea suficientemente grande para volarlo él solito, yo no pienso volver a volar quads. Prefiero usar mi poco tiempo disponible para centrarme en los aviones que son mucho mas amigables para el piloto principiante, hacer mis primeros pasos en FPV y dedicarme a algunos proyectos que tengo en mente.
So, this post is to officily declare to the world that I suck as a quadcopter pilot, and until I get a flight simulator or my kid becomes old enough for him to flight, I won't see myself trying again. I'd rather expend my little time in the airplanes that are more flight-friendly, the FPV and my upcoming new projects.

¡Pero que mi historia no les desanime! Fabricar los quads es divertido, y quien dice, tal vez uds resultan mucho mejor piloto que yo y terminan disfrutando.
But please don't think in quitting if you are starting!... Perhaps you are better pilots than me!!


¡Buenos vuelos!
Good flights!

Monday, 3 December 2012

QUADCOPTER - 7ma Entrega - Calibración de los ESC

QUADCOPTER - 7th Delivery - ESC Calibration


Para calibrar los ESC (controladores de los motores eléctricos) hay que conectarlos uno a uno al receptor de la radio y realizar la siguiente secuencia: 
To calibrate the ESC you need to connect them one by one to the RC receiver and follow the next steps:

1) conectar el ESC al receptor, manteniendo el transmisor apagado
1) connect the ESC to the receiver, keeping the transmitter turned off
 
2) conectar la batería al ESC
2) connect the battery to the ESC

3) mover el stick del thrust (power del motor) a tope
3) move the thrust stick to the maximum position in the transmitter  
 
4) encender el transmisor
4) turn on the transmitter
 
5) luego de escuchar dos "beep" provenientes del motor, bajar el stick a 0
5) you will hear two short "beeps" coming from the motor, after this, put the thrust stick to 0
 
6) se escucharán dos "beep" cortos y uno largo, confirmando que el ESC ha quedado calibrado para el recorrido de la radio.
6) then you will hear 2 short "beeps" followed by a longer one, which are confirming that the ESC is now calibrated for the thrust stick of our RC transmitter.

Es importante prestar atención antes de realizar la calibración de que en caso de contar con un transmisor con programación, los recorridos de los sticks estén al 100%. De lo contrario el ESC se calibrará al recorrido del setup del transmisor y no al real.     
Please pay attention in those programmable radios to have the path of the sticks in 100%, otherwise the ESC will be calibrated to the set path and not to the total path.

Sunday, 2 December 2012

QUADCOPTER - 6ta Entrega - Evolución

QUADCOPTER - 6th Delivery - Evolution

Llevo tiempo sin postear por razones familiares, pero acá estoy nuevamente para dejarles algunos comentarios e impresiones luego de varias pruebas con el quadcopter. Mucho ha llovido desde mi último post relacionado al quad...
It's been such a long time since my last post and due to familiar reasons I was not able to keep the blog updated... but here I am again bringing you some comments and impressions after some tests and changes in the quadcopter. A lot have happened in this time... 


Luego de algún accidente catastrófico que demandó una revisión total, se puede decir que del quad original poco queda ya. Por la falta de experiencia asocié la inestabilidad de los primeros vuelos a la estructura de madera que había fabricado (luego comprobaría que esto no era correcto) y a la placa HobbyKing v1.1. Así que tratando de solucionar esto fabriqué un nuevo cuadro mas pequeño con brazos de aluminio y compré una placa controladora HK KK2.0

After one or two catastrophic accidents that demanded a complete revision, I can say that there is not too much remaining from the original quad. Due to the lack of experience I asociated the instability of the first flights to the wooden frame and the HobbyKing v1.1 controller (later I was going to discover that this was not right) So, trying to solve this I've done a new frame, smaller, with aluminium arms and I've bought a HK KK2.0 controller.


Pero el cuadro original de madera y la placa v1.1 tampoco parecían ser el problema. De hecho, con la nueva placa KK2.0 no pude hacer despegar el quad del suelo porque se daba vuelta. Empecé a pensar que la placa estaba mal porque todo el mundo hablaba muy bien de esta placa y yo parecía ser el único con problemas.
But the original wooden frame and the v1.1 controller seemed not to be the problem either. In fact, with the new KK2.0 controller I was not able to raise the quad from the floor as it was flipping in the first shot. I started to think that the new controller was wrong because everybody was speaking really good about it and in my case it was a desaster.

Pero finalmente luego de leer varios blogs y foros, me dí cuenta que ¡no había hecho la calibración de los ESC!. Originalmente yo pensaba que esto de la calibración estaba relacionado con algún tipo específico de ESC programable, pero luego me di cuenta que casi en la totalidad de los ESC es posible (y se debe) realizar la calibración para detectar todo el rango del stick de la radio.
But finally, after reading other blogs and forums, I realized that I haven't done the ESC calibration!... I thought that this was related to some kind of specific ESC that you can program, when I found out that in almost all the cases you can (and must) do the calibration in order to detect the whole path of the thrust stick in the radio.
 
Luego de realizar la calibración salí a probar el quad nuevamente y el cambio fue radical. A la primera, sin cambiar ningún parámetro de la controladora, el quad despegó con total estabilidad y el control fue mucho mas simple. Ahora me toca aprender a volarlo, porque en el 2do vuelo lo colgué de un arbol (recomendación: no volar cerca de árboles en los primeros vuelos).
After doing the calibration of the ESC I went out to test the quad and the change was radical. In the first flight, without changing any other parameter of the controller, the quad took off totally estable and the flight control was much easier than before. Now I need to learn to fly this damned thing, because in the 2nd flight the quad ended in the top of a tree (suggestion: don't flight close to trees in your first flights).

Monday, 25 June 2012

QUADCOPTER - 5ta Entrega - Primeros Vuelos

QUADCOPTER - 5th Delivery - First Flights

Primeros vuelos, primera catástrofe. No hay mucho que explicar, los videos lo explican todo. Solo decir que la puesta a punto es bastante complicada (de hecho, no la he conseguido). He seguido las indicaciones del blog de Javier Rullán, que han sido de mucha ayuda (incluso el cambio de dirección de los acelerómetros, que no giróscopos), pero no fue suficiente para lograr un vuelo nivelado, y luego de varias pruebas a poca altura, cuando parecía que lo tenía bajo control, me largué a un vuelo con altura y justamente control fue lo que faltó... el quad se giro y cayó como un cascote...
First flights, first catastrophe. There is not too much to explain, the videos are self-explaining everything. Just say that the set-up is much more complicated than expected (in fact, I was not able to do a correct setup). I've tried to follow the indications from Javier Rullán's blog (I promise a new delivery with the translation), I even did the test and invertion in the accelerometers, but it was not enough to get a levelled flight, and after some tests at low altitude and when I thought I was having everyhing under control, I did a flight at a higher level and it was control what I hadn't, and the quad flipped and felt down like a stone...


Tuesday, 19 June 2012

QUADCOPTER - 4a Entrega - Fotos

QUADCOPTER - 4th Delivery - The Pictures

Editado 07/07/2012: nuevas fotos / Edited 07/07/2012 - New Pictures

No tengo ganas de escribir, así que les dejo las fotos sin mas comentarios. Cualquiera puede entenderlas.
I'm too lazy to write today, so I just put the photos without further comments. Everybody can understand what's going on there.


Saturday, 2 June 2012

QUADCOPTER - 3a Entrega - Estimación de autonomía y empuje

QUADCOPTER - 3rd Delivery - Range Estimation & Thrust


AUTONOMIA / RANGE

Un quadcopter es, básicamente, un ladrillo volador... dependiendo de qué pais seas, tal vez un piano volador... Ya te imaginarás lo que puede pasar si en pleno vuelo se te acaba la batería... 
A quadcopter is, basically, a flying brick.. or perhaps a flying piano, depending from where are you originally from... You can imagine what could happen if in the middle of your flight your batteries run out of power...

Así pues, es fundamental hacer una estimación de autonomía, para aterrizar antes de la catástrofe... Y esta estimación es muy fácil de realizar.
Therefore, is extremely important to do a range estimation, to do a safe landing instead of having a catastrophe... and this estimation is quite easy to do.

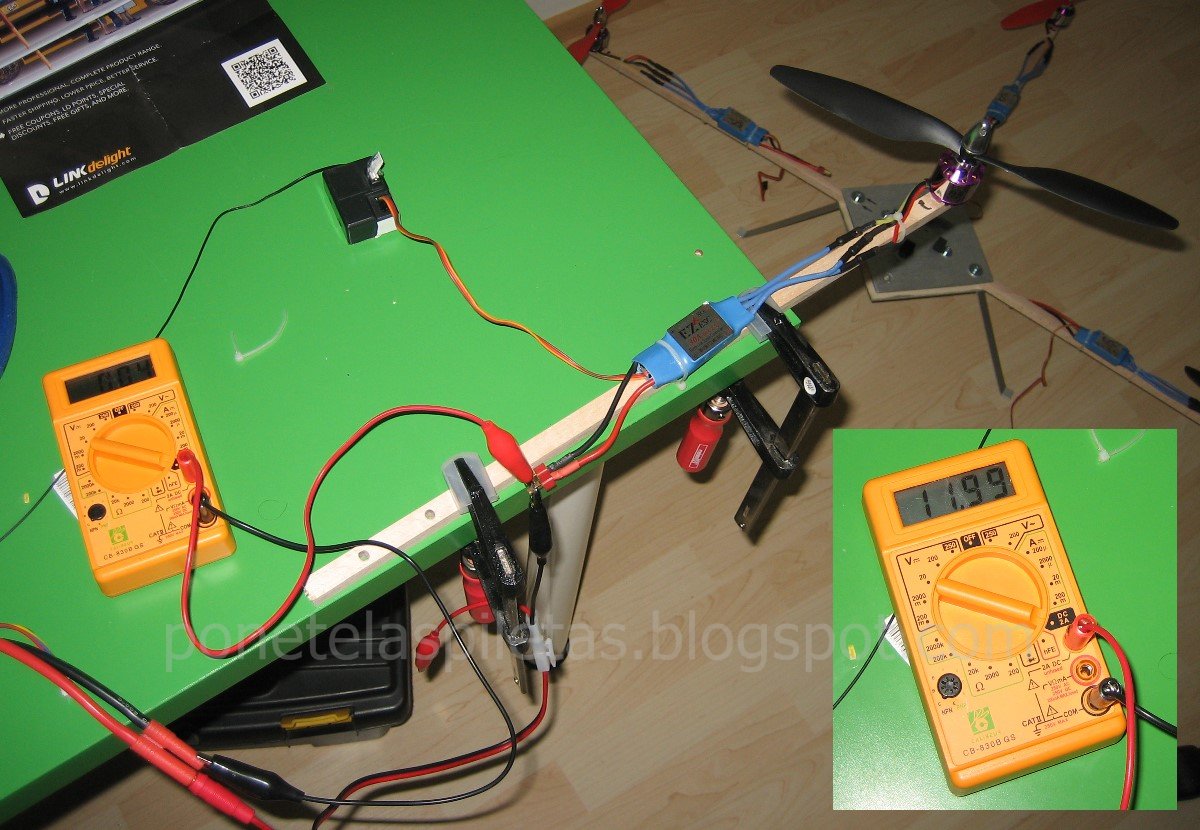
Lo que haremos es medir la corriente consumida por uno de los motores a plena carga. Con plena carga no solo me refiero a "motor a pleno", sino también con la hélice montada.
What we are going to do is to measure the current with one of the motors full loaded. And with full loaded I'm not referring to "full throtle", but also with the propeller mounted.

Luego multiplicaremos por la cantidad de motores (en mi caso 4), estimaremos un extra de miliamperios para la electrónica, aplicaremos algún factor de seguridad que tenga en cuenta la pérdida de carga de la batería a lo largo de su vida, y dividiremos la corriente total resultante por la capacidad de nuestra batería. Así obtendremos el tiempo que podremos utilizar nuestro quadcopter en el aire de modo seguro.
Then we will multiply the current by the quantity of motors (in my case 4), we will estimate an extra current comsumption for the electronic, we will apply a safety factor in order to take into account the lose of life of the battery and, finally, we will divide the resulting current by the capacity of our battery. In this way we will obtain the time that we can use our quadcopter in a safe way.


Les dejo el ejemplo para mi quad:
The example for my quad:

Datos de la Batería / Battery Data
V = 11.1V
C =  3300 mAh (3,3 Amper x hour)

Consumo del motor / Motor current comsumption
I = 12A 

Consumo motores / Motors current comsumption
Im = 12A x 4 = 48A

Electronica / Electronics curent comsumption
Ielec = 0,5 A

Factor de vida de batería (seguridad) / Battery life factor (safety)
SF = 0,8

Consumo total estimado / Estimated total comsumption
It = (Im + Ielec) / SF
It = 60 A

Autonomía estimada / Estimated range
t = C / It 
t = 0,055 hrs = 3,3 min

Por supuesto que este cálculo es conservativo, ya que durante un vuelo normal no vamos a usar los motores a su máxima potencia todo el tiempo. Lamentablemente de momento no tengo como medir el empuje real producido por motor y hélice, por lo que me es imposible estimar qué potencia será necesaria para mantener el quad en posición recta y nivelada, o estimar una curva de potencia para un vuelo típico. Mi estimación es que probablemente la autonomía sea de entre unos 6 a 10 minutos, sino mas.
Of course that this analysis is conservative, because during a normal flight we are not going to extract the maximum power from the motors at every moment. I'm afraid that by the moment I'm not able to measure the real thrust produced by the propeller, so it's quite hard to estimate how much power will be needed to keep the qued levelled, or to estimate a typical flight power curve.My estimation is that, probably, the range will be around 6 to 10 minutes, or even more.


EMPUJE / THRUST

De acuerdo con la data disponible del motor, la máxima potencia que puede erogar es 255W y tiene una relación velocidad-tension de 1000KV (1000 RPM por cada voltio). Considerando que la corriente necesaria para generar 255W de potencia a 11,1V es 23A (I = P/V) y que durante la prueba que he realizado el motor a máximo empuje estaba consumiendo 12A, se puede estimar las RPM real para dicha situación, y posteriormente obtener el empuje mediante alguna calculadora de empuje que hay por la web, como por ejemplo ESTA.
In accordance with the information of the motor, the maximum power produced is 255W and it has a relationship speed-voltage of 1000KV (1000 RPM for every Volt applied). Taking in consideration that the current needed to generate 255W @ 11,1V is 23A (I = P/V), and that during the test that I've done I get a max current of 12A, it's possible to estimate the real RPM for that precise situation, and afterwards get the thrust using one of the calculators available in the internet, like for example THIS.

Motor = C2830 1000KV
Propeller = 10x4,7

I = 12A  (current from test)
Imax = 255W / 11,1V = 23A
RPMmax = 1000KV x 11,1V = 11000 RPM

23A  -----  11000 RPM
12A  -----  x = (12 x 11000) / 23 = 5740 RPM

10x4,7 prop @ 5740 RPM = 0,575 kg


Friday, 25 May 2012

QUADCOPTER - 2da entrega - Bastidor

QUADCOPTER - 2nd delivery - Frame

revision 04/05/2014: links reloaded

Voy avanzando con el quadcopter a buen ritmo, pero para poder compartir la información quería juntar algo de tiempo para hacer unos planos de la estructura.
I'm advancing quite smoothly with the quadcopter, and in order to share the information in a better way, I was looking for some time for making some sketches of the structure.


Las imágenes son de poca calidad, así que les he dejado unos .pdf en los siguientes links.
The pictures are low quality, so I've left you the .pdf files in the following links.

Drawing 1
Drawing 2

Como se puede ver en los planos, el frame es muy simple y está pensado para que sea fácilmente desmontable y así poder transportarlo más cómodamente. He preferido dejar uno de los brazos completos de punta a punta (el otro está dividido en dos) para darle algo mas de rigidez a las placas de terciado.
As you can see in the drawings, the frame is very simple and it's been designed to be easily removable and in this way, simplify the transportation. I preferred to leave one of the arms untouched (the other is splitted in two pieces) to give more stiffness to the base plates.


En la próxima entrega vienen las fotos de la fabricación y algunos comentarios.
In the next delivery come the pictures of the construction and some comments.

Monday, 21 May 2012

Accerios de montaje motores brushless serie C28 - Dimensiones

C28 series brushless motors mounting seat (support)


Dimensiones de los accesorios de montaje para la serie C28 de motores brushless. Estos accesorios vienen con los motores C2830 KV1000 que compré para el Quadcopter, por lo que no es necesario comprarlos por separado.
This is useful information of the mounting seat and coupling accesories for the C28 series brushless motors. These accesories are included in the C2830 KV1000 motor package sold in ebay that I bought for the Quadcopter, so you don't need to buy them separately.

Sunday, 13 May 2012

QUADCOPTER - 1ra Entrega

QUADCOPTER - 1st delivery

Como volar aeromodelos no se me da muy bien, y qué mejor que poder volar tu propio "engendro", llevo algunas semanas recolectando información para hacer mi propio quadcopter. A estas alturas (May 2012), no hay nada que inventar y todos los componentes son más que accesibles, ya sea en una tienda de modelismo o por ebay.
As this thing of flying model airplanes is not my speciality, and what can be better than flying your own monster, I've been the last weeks collecting information to do my own quadcopter. At this point in time (May 2012) there is nothing to invent and all the components are pretty accesible, either in a specialized modeling store or via ebay.

El sitio web que más me ha servido para tomar referencias es el blog de Javier Rullan, con su quadcopter Icarus III, aunque finalmente lo único que mi quad tendrá en común es "el cerebro", made in HobbyKing.
The most useful website that I've found to take references is the blog from Javier Rullan, with his quadcopter Icarus III. However, the only common of my quad with Javier's will be the "brain", made in HobbyKing.

Los componentes que he elegido para el quad son:
The components that I've selected for the quad are:

- 1 x Placa controladora Multi-Rotor Control Board V2.1 (Atmega168PA) de HobbyKing
- 1 x Control board Multi-Rotor Control Board V2.1 (Atmega168PA) from HobbyKing
- 4 x motores brushless C2830 KV1000 comprados en ebay
- 4 x brushless motors C28320 KV1000 from ebay
- 4 x hélices 10x4,5, dos horarias y dos anti-horarias de ebay
- 4 x propellers 10x4,5, two CW and two CCW from ebay
- 4 x controladores de motor ESC marca EZ de 30A, de ebay
- 4 x 30A EZ ESC motor controllers from ebay
- 4 x adaptadores de hélice para eje de 3,1 mm, de ebay
- 4 x propeller adapters for 3,1mm shaft, from ebay
- 1 x bateria de Litio-Polimero (LiPo) de 3 celdas (3S = 11,1V), 3300 mAh y 30C de capacidad de descarga (30C = 30x3,3A = 99A corriente maxima de descarga)
- 1 x Lithium-Polimer battery (LiPo), 3 cells (3S = 11,1V), 3399 mAh and 30C discharge power (30C = 30x3,3A = 99A max continuos discharge current).


Los precios aproximados son:
The approx. prices are::

Control board = 15,00€
Motor (x4) = 21,00€
Props (x4) = 5,30€
ESC (x4) = 26,60€
Prop. adapt (x4) = 4,70€
Battery (x1) = 26€


La próxima entrega la hago cuando tenga fotos del avanze de la estructura portante.
The next post will be available as soon as I can get some pictures of the evolution of the frame.