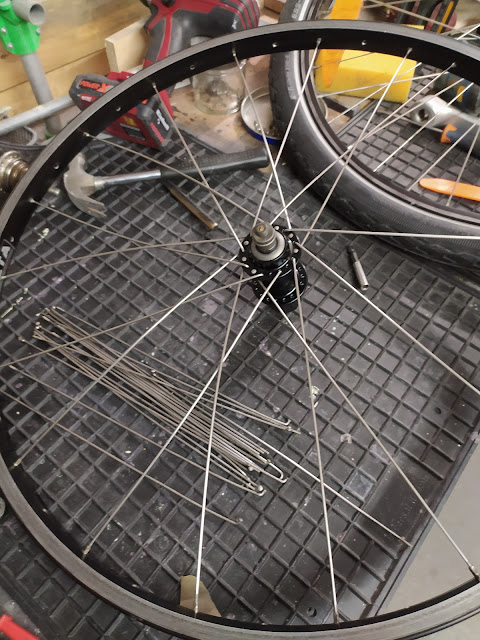
After finishing with the frame, I moved to the wheels. I thought it was going to be easier here, more like a plug-and-play situation, but it wasn't. I needed to do a couple of things to make this work.
Firstly, I started by preparing the front wheel. As the original tires were literally destroyed, I bought a pair of Schwalbe Marathon and I added some anti-puncture tire liner as extra protection (although the Marathon already have some extra thickness dedicated to anti-puncture). I bought this latter from AliExpress, and it's pretty amazing, I've tried to pin trough it and I couldn't, so it looks promising.
Yeah, these are not the Marathon Plus, but I'm not planning to go around the globe with this bike. This was supposed to be a cheap bike restoration, so my budget was limited and I was already exceeding it.
This is the tape (sorry, tire liner) I bought from AliExpress. I think it costed me like 2€ per wheel?
The front wheel was a piece of cake, as I haven't changed the hub. Tthe original bearings were OK and everything looked pretty solid.
The problem started with the rear wheel. To be able to install the bigger cassette I needed to install a new hub (the original wheel was having a flywheel instead of a cassette). Up to that it was pretty clear. Even the clearance to fit the new hub in the frame seemed to be just right (well, yeah, I probably needed to force the frame a little bit to get a couple of mm more of clearance). However, it was the first time ever I was mounting spokes.
So I researched a bit how was the best way to do this, I understood there is a specific sequence to mount them, and that I was going to need a small jig that help me to hold the wheel while I was rotating it so I could put the right tension in the spokes and get the proper alignment. I'm not going to describe the whole process, there are infinite websites and youtube videos where you can find this info.
You can't see it in the picture because the jig was in a preliminary status, but to be able to control the wheel alignment what I used was a M8 bolt that I screwed through the wood at one of the vertical supports. I adjusted the screw to get it closer to the rim of the wheel (to the area where the brake pads touch the rim) and by spinning the wheel you can see the gap at that location opening and closing. The wheel will be perfectly aligned when the gap remains stable during the whole rotation of the wheel.
I warn you, this takes a while.
But that was not the worst part with the rear wheel. From the picture above maybe you are able to see with the new hub with the adapter for the cassette how much the rim is shifting to one side; in the original wheel the rim was almost in the center of the hub, and the original wheel was fitting perfectly in the frame, and it ended perfectly aligned with the middle plane of the bike frame... well, if you shift the rim to a side, and you don't do any adaptations to the frame (like cold-bending it) you will end up having a wheel that is not centered with your frame, and all the rest of the equipment that works with the wheel (mud fenders, brake pads, etc.). If you look carefully you can see what I mean in the next picture (look at the uneven length of the brake pads' arms, look at the position of the central cable binder with respect to the mud fender, which by the way in the picture it has been already corrected to a side to align with the new wheel).

The next issue I faced with the rear wheel was the adaptation of the rear derailleur. I thought it was going to be easier to find an adapter that fits in the original frame, but it wasn't. None of the stuff I've seen in the internet, including the Chinese stuff seemed to be capable of helping me, or at least it was not clear enough as only in very few cases you are able to find such adapters accompanied from detailed drawings. So as I was not sure and I was already over budget, I decided not to spend 20€ in something I didn't know it was going to work, and I made my own adapter.
And here is where I understood why the guys touring around the world are so much into the steel frames. If something brakes (or like in my case, you need to add an adapter) you just cut a piece of steel and you weld it to the frame with the simpler welding machine. It's not the nicest solution, but it does the job.
It has a trick though: the derailleur needs a stoppage at the adapter, otherwise it will turn forward pulled by the chain. If you end up doing what I did, you will need to find the best way with your own means to make this work. In my case I did a small cut in the metal part with the angle grinder to allow the derailleur to block its turn against this small dent.
In addition to this, as you can see I needed to use a M10 threaded rod (can be an M10 bolt) and a couple of self-locking nuts to keep everything in place. I paint the whole thing with a corrosion blocker, but I definitely need to improve this if I'm planning to take more seriously the idea of travelling with this bike.


No comments:
Post a Comment